From cameras, lenses, down jackets, flashlights, headlamps, etc. I’ve put my blood, sweat, and fears into the gear list below, as well as consumed massive amounts of coffee staying up nights testing it all. If the list below helps you in any way, please consider using the affiliate links to purchase your new equipment. The links DO NOT cost you extra, but help to support our work, allowing us to keep the list updated… and buy more coffee.
How to Select a Camera for Night Photography
Selecting the right camera body for night photography can be a daunting task. During all my time and investment photographing the night sky, I’ve never found the ‘perfect’ camera body or lens. Don’t let this discourage you because this limitation doesn’t have to stop you from creating great photos. When I began photographing in 2011, I shot with a Nikon D700 and had to use 36 seconds of exposure to successfully capture the distant details of the Milky Way. A lot has changed since then and camera technology has rapidly improved with high ISO quality, dynamic range, and an increase in megapixels. Nowadays, you can find a full-frame camera and lens setup, perfectly capable of capturing the night sky, for ~$1,200.00. But how do you go about doing this? Well, I will start by stating: there is no perfect right or wrong answer.


In my humble opinion, you can’t go wrong selecting a camera from Nikon, Sony, or Canon. I’ve used all three camera bodies at some point in my career and each company offers a slightly different experience than the next. Nikon and Canon were the go-to, full-frame DSLR manufacturers for many years. However, in 2013, Sony brought the first full-frame, ‘mirrorless camera’ to the market and has been one of the leading innovators since. All ‘BIG THREE’ camera manufactures offer mirrorless cameras now, with lenses specifically designed for their mirrorless systems. Nikon has been my go-to for many years, primarily because of the incredible performance from one of my past favorite lens for night photography: Nikon 14-24mm f/2.8, which has now been replaced with the Sigma 14mm f/1.8 Art Lens. The Nikon lens alone persuaded me to buy into the Nikon system in 2011, and I haven’t found the need to look around much for upgrades since then. Additionally, I also used a Canon 5D Mark III for a number of years and it was an exceptional camera body and workhorse. I tried the Sony a7R III a few years ago, but found the interface to be very frustrating, in addition to poor battery life. With all this experience and data supporting me, what camera do I recommend at this point?
Now, knowing what I know about each camera and manufacturer, including the type of art I wish to produce, my camera body selections are based upon the following performances: High ISO vs Noise, usability, and pricing.
High ISO vs Noise
To successfully photograph the night sky, your camera needs to be able to handle long exposures with very high ISO levels. To put this bluntly, these settings will create noise in your images. The images below show some of the best cameras available from each manufacturer at a high ISO of 6400. Do you notice how noise varies with each camera body? In this example, you can see the Canon EOS R3 is the (expensive) winner in terms of low noise and definition, but the Nikon D780, considered an affordable, entry-level DSLR, is close to second place.

Usability
In regards to usability, you need to be able to easily focus your lens at night and operate your camera settings without using your headlamp. Being able to do both of these tasks in the field makes your experience of photographing the night sky much more enjoyable.
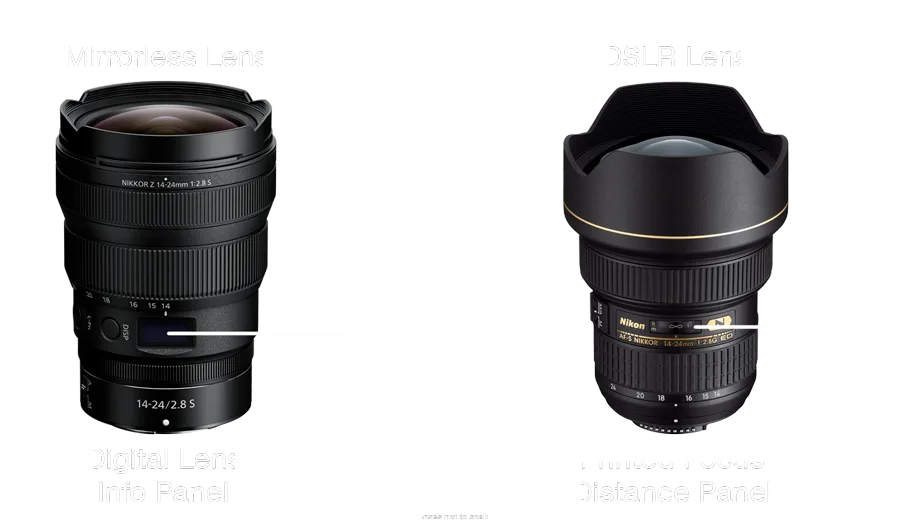
One of the biggest difficulties I see my students struggle with is focusing at night with mirrorless cameras. Lenses created for DSLR’s typically have a printed ‘focus distance’ chart that allows you to easily set your focus ring to ‘infinity.’ However, lenses designed for mirrorless cameras have a ‘digital lens info panel’ which can complicate this task. Setting your focus ring to ‘infinity’ doesn’t necessarily mean your lens is focused on infinity; every lens is different. Micro adjustments to fine-tune your focus are typically required. The digital lens info panel makes this task difficult to perform. Users typically have to use the back of their LCD screen, find a bright object to focus on, and adjust accordingly until they believe they are focused on infinity. This process not only wastes time, it isn’t 100% accurate, and must be repeated if you turn your camera off. This is one of the reasons I have not switched to a mirrorless setup. The Canon R and Sony Mirrorless series make this process a little easier by providing a focus distance chart on the LCD screen when the focus ring is manually adjusted, but your night vision is altered by this process.
Being able to operate your camera settings at night is also critical. One of the features I love about my Nikon D850 is some of the buttons on the back of the camera can be subtly illuminated. This allows quick access to modify camera settings, image review, and easier usability without turning on your headlamp.
Pricing
The moment I walked into a camera store in Texas, I heard the clerk ask a customer: “Do you really need that much camera”? A strange question to ask, nevertheless, it’s something to consider before making a big purchase. I don’t photograph wildlife or birds in motion, so I personally don’t need a $6000+ camera that can shoot 30 frames per second. I actually prefer a camera body with ~25 megapixels, excellent dynamic range, 360 tilt screen, illuminated buttons, lightweight, easy interface… the list goes on. In fact, the Nikon D780 is almost a perfect match for me which is a 1/3 of the cost of most flagship cameras. It’s important to think about what you plan to do with your work before investing in a setup. I also highly recommend renting a system and trying it out to make sure you’ll be happy with your investment for years to come.
How to Select a Lens for Night Photography
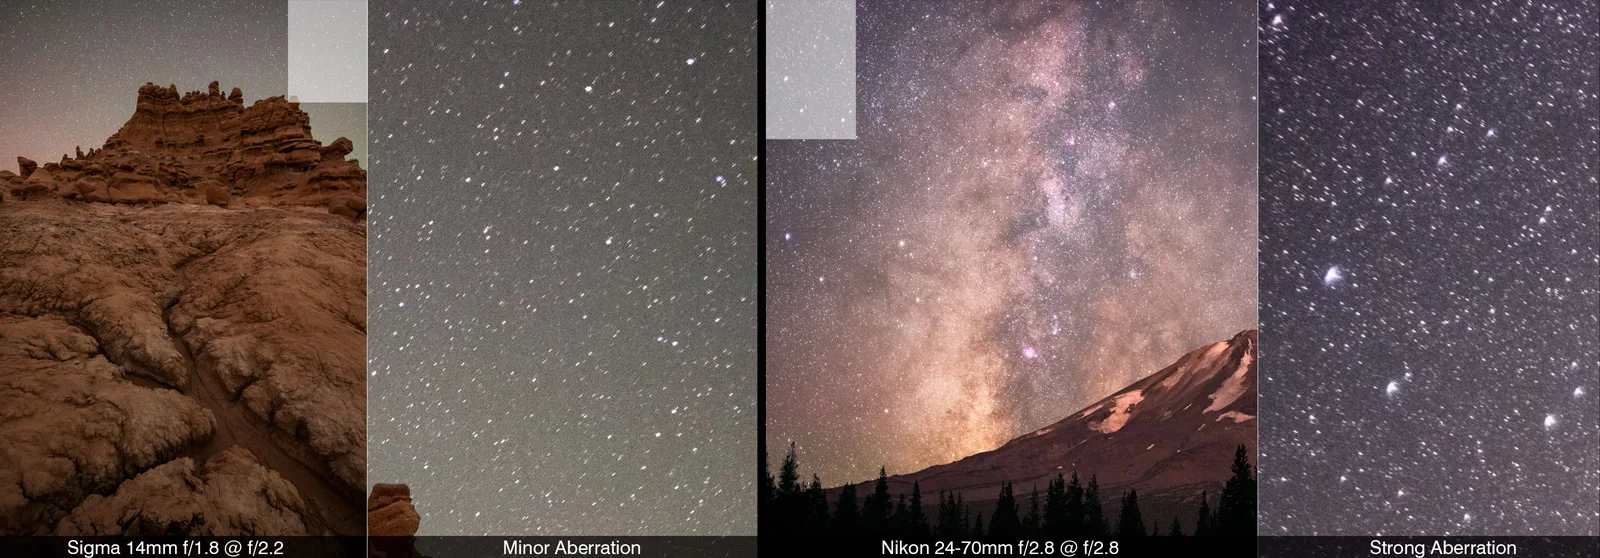
Selecting a proper lens for night photography is essential and can also be a challenge primarily because each individual is producing a different medium than the next. For example, I’m focusing my work on the production of a 4K, time-lapse film and large prints. Therefore, I want to make sure the lens I’m using has high quality sharpness from the center of the image, all the way to the outer edges. I also make sure the lens has minimal aberration and includes a large aperture of f/2.8 or greater. The focal length of my lens varies based upon my subject. When I focus on an intimate landscape subject and the night sky, I prefer a wide-angle lens of 14mm – 24mm so I can incorporate both elements of land and sky. If you plan to share your images exclusively online (social media outlets, websites, etc), then your level of expectations from a lens may be much different than mine. You might be perfectly happy with a very affordable Rokinon 14mm f/2.8 lens. This lens was not sharp enough for the work I was producing, but certainly meets the ‘online-only’ criteria.
What is the best camera and lens for night photography?
I’ve included the best camera bodies and lenses from each manufacturer in the following pages:
You can rent camera bodies and lenses before investing in a system at lensrentals.com, lensprotogo.com, or your local camera store if available.
My Personal Night Photography Equipment List
Essential Items In the Field
- Headlamp: Nitecore UT27 Pro 800 Lumen Headlamp – My favorite, USB-C rechargeable headlamp. No more AAA batteries! (But you can still use them in a pinch)
- Intervalometer – I prefer this brand over the larger manufacturers. Make sure to get the correct connection for your camera.
- Phosphorescent Tape – Subtle, glow-in-the-dark tape that can be applied to any equipment. I prefer wrapping this tape around tripod legs so I can avoid them in the dark.
- Proton Pro Flashlight – Been using this less since getting my headlamp above.
- HotHands Hand & Body Warmers: Large Size | Small Size
- Camera Rain/Dust Cover – Never leave home without it. Great for dusty/windy/rainy conditions
- Insulated Down Pants
- Gloves
- UV Reflective Umbrella
- Foam pad for sitting/laying on the ground or your gear
- Backpacking Chair – For short hikes
- Backpacking Tripod Chair – More mobile and less bulk
- Lens cleaner
- Barber Duster Brush
- Dust Rocket – For cleaning camera sensor in an enclosed environment
- Goggles – Perfect for dusty/windy conditions
Standard Items
- Shimoda Designs Action X50 Backpack – Comfortable photography backpack with plenty of storage for other equipment. Thicker straps are preferred.
- RRS TVC-24 Versa Series MK2 – Travel friendly, stable, lightweight tripod legs
- RRS BH-40 Ball Head with Full-Size Screw-Knob Clamp
- L-Bracket – Essential for capturing panoramas. Make sure to select the proper bracket for your specific camera body.
- Winter hat with fleece lining that covers ears
- Light Down Jacket w/ Hood
- Heavy Down Jacket w/ Hood
- Heavy Down Jacket w/ Hood & Water Resistant Coating
- Thermal Base layer (Mid-Weight): Legging & Top
- Wool Socks *lifetime warranty
- Waterproof Shell: Jacket & Pants
- Hiking Shoes
- Hiking Boots
- Backpacking Sleeping Pad
- Keep things cold when car camping
References above are affiliate links. We may earn a small commission to buy a cup of coffee.
My Favorite Mobile Apps for Planning Night Photography


Contents listed are for informational purposes and are only intended for use as a guide. Please use at your own discretion and enjoy!